- Add your property to the actual property files
I simply did a file search for juddiv3.properties and only modified
the ones that were under version control. As of 3.1.4, the require
files are at
juddi-core-openjpa/src/test/resources
juddiv3-war/src/main/webapp/WEB-INF/classes
juddiv3-samples/src/main/webapp/WEB-INF/classes
Simply add a new line towards the bottom with whatever you need. - Within the juddi-core project, locate the class org.apache.juddi.config.Property. Despite its name, it's actually a constants interface class. Add your own custom property name here. Here's an example of one I just added for enforcing the registration of tModels before using them as well as a few other things.
public final static String JUDDI_ENFORCE_REFERENTIAL_INTEGRITY = "juddi.validation.enforceReferentialIntegrity";
- jUDDI uses the Apache Commons Configuration API. Example:
AppConfig.getConfiguration().getBoolean(Property.JUDDI_ENFORCE_REFERENTIAL_INTEGRITY">);
Be sure to change it to the correct data type for whatever you're using. - You're now ready to use it somewhere. In the following example, we are defaulting to a value of false.
            boolean checkRef = false;
            try {
                checkRef = AppConfig.getConfiguration().getBoolean(Property.JUDDI_ENFORCE_REFERENTIAL_INTEGRITY);
            } catch (ConfigurationException ex) {
                log.warn("Error caught reading " + Property.JUDDI_ENFORCE_REFERENTIAL_INTEGRITY + " from config file", ex);
            }
Now you're ready to go test it! - Finally, make new Issue in the issue tracker. Then make a SVN patch, attach it and eventually a commiter will either comment back on it or add it to the baseline,

Saturday, March 9, 2013
jUDDI Dev HowTo: Add a new configuration element
As a noob jUDDI developer, I've found there's a few basic things that haven't been documented that may make someone else's life a bit easier. Without further ado, here's a simple how-to guide for adding new configuration elements to jUDDI (server side)

Monday, March 4, 2013
UDDI HowTo: Create tModels with a custom key
When I first started working with UDDI registries, I came across an interesting use case, attaching data to a binding template. For those in the know, binding templates are UDDI's equivalent to a a specific company's service offering, such as a car mechanic's. The additional data might be performance statistics for the that mechanic, such as "I replace starters within 15 minutes".
Moving on, I had a registered service and wanted to add some data to it. This add on data is expressed as tModels in UDDI. tModels are nothing more than a key, name, value tuple. The catch with UDDI is that all tModel keys need to be registered before they can be used. I was discovered is that registering a new tModel isn't as straight forward as I thought it would be. The rest of the post is a how-to guide for creating new tModels in UDDI by first creating a tModel Generator. A tModel Generator is also known as a tModel Key Partition in jUDDI.
From first hand experience, this process is identical for most of the UDDI services that exist, both commercial and open source.
1) Identify a domain that the tModels are related to. Such as a www.mycompany.com. This will become a "partition" in jUDDI. If you reference the UDDI spec, this is actually called a "keyGenerator"
2) Using the Publishing web service to call "save_tModel" with at minimum the following items defined.
tModelKey = uddi:www.mycompany.org:keyGene
Note: tModel keys, at least in jUDDI, converted to all lower case. Some implementations support mixed case, but to be safe, always use lower case.
Moving on, I had a registered service and wanted to add some data to it. This add on data is expressed as tModels in UDDI. tModels are nothing more than a key, name, value tuple. The catch with UDDI is that all tModel keys need to be registered before they can be used. I was discovered is that registering a new tModel isn't as straight forward as I thought it would be. The rest of the post is a how-to guide for creating new tModels in UDDI by first creating a tModel Generator. A tModel Generator is also known as a tModel Key Partition in jUDDI.
From first hand experience, this process is identical for most of the UDDI services that exist, both commercial and open source.
1) Identify a domain that the tModels are related to. Such as a www.mycompany.com. This will become a "partition" in jUDDI. If you reference the UDDI spec, this is actually called a "keyGenerator"
2) Using the Publishing web service to call "save_tModel" with at minimum the following items defined.
tModelKey = uddi:www.mycompany.org:keyGene
- Name, such as My Company's Keymodel generator
- A KeyedReference tModel in the categoryBag with the following defined: ModelKey="uddi:uddi.org:categ
orization:types" - keyName="uddi-org:
keyGenerator" keyValue="keyGenerator" - An authentication token ( see the Security API)
            SaveTModel st = new SaveTModel();
            st.setAuthInfo(key);
            TModel tm = new TModel();
            tm.setName(new Name());
            tm.getName().setValue("My Company's Keymodel generator");
            tm.getName().setLang("en");
            tm.setCategoryBag(new CategoryBag());
            KeyedReference kr = new KeyedReference();
            kr.setTModelKey("uddi:uddi.org:categorization:types");
            kr.setKeyName("uddi-org:keyGenerator");
            kr.setKeyValue("keyGenerator");
            tm.getCategoryBag().getKeyedReference().add(kr);
            tm.setTModelKey("uddi:www.mycoolcompany.com:keygenerator");
            st.getTModel().add(tm);
3) Send in the request.
            TModelDetail saveTModel = publish.saveTModel(st);
            System.out.println("Creation of Partition Success!");
4) You may now create tModels with keys start with "uddi:www.mycompany.com:" such as uddi:www.mycompany.com:somecus
            tm = new TModel();
            tm.setName(new Name());
            tm.getName().setValue("My Company's Department");
            tm.getName().setLang("en");
            tm.setTModelKey("uddi:www.mycoolcompany.com:department");
            st.getTModel().add(tm);
            saveTModel = publish.saveTModel(st);
            System.out.println("Creation of tModel Department Success!");

            tm = new TModel();
            tm.setName(new Name());
            tm.getName().setValue("My Company's Authentication Method");
            tm.getName().setLang("en");
            tm.setTModelKey("uddi:www.mycoolcompany.com:authmode");
            st.getTModel().add(tm);
            saveTModel = publish.saveTModel(st);
            System.out.println("Creation of tModel Auth Mode Success!");
Note: tModel keys, at least in jUDDI, converted to all lower case. Some implementations support mixed case, but to be safe, always use lower case.
New jUDDI Console is under construction
We have a new contributor, Alex O'Ree, working on a proper console for jUDDI.
Here is a quick snapshot where he is at right now:
Cheers,
--Kurt
Cheers,
--Kurt
Saturday, February 23, 2013
Setting up jUDDI in Eclipse
I recently helped a developer with setting up eclipse, which I thought would be helpful for other people too.
1. Start with a fresh eclipse Juno:
http://www.eclipse.org/downloads/packages/eclipse-ide-java-ee-developers/junosr1
2. Launch eclipse and go to the market place to install:
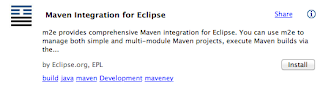
m2e:
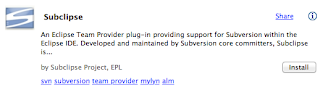
subeclipse:
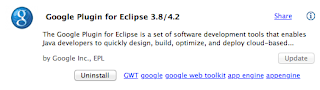
gwt:
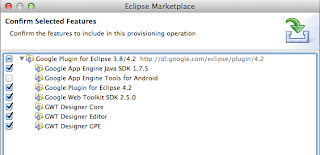
but do not select tools for andriod:
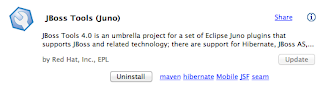
JBoss tools:
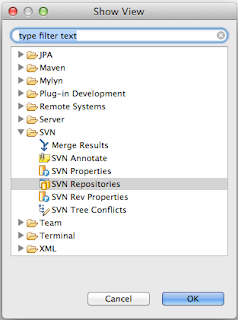
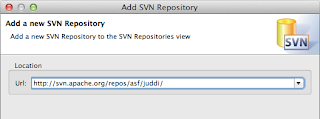
Open the SVN Repository window and add the juddi repository
if you get the following error
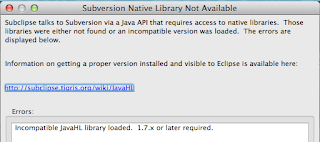
then select the pure Java SVNKit
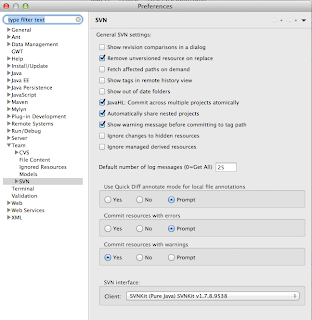
and continue to check out the trunk
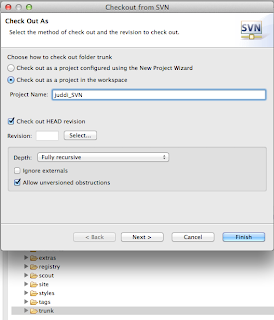
When the checkout completes import all modules as projects using Check out as an existing maven projects
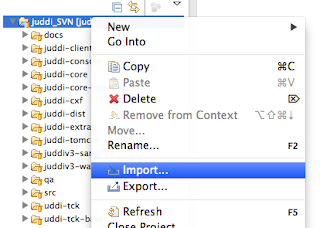
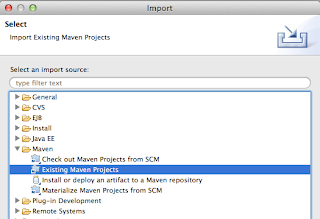
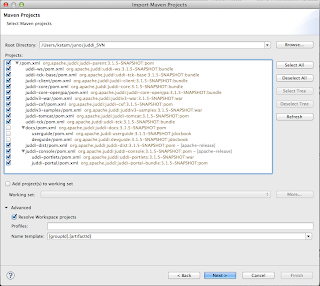
I got the following issues:
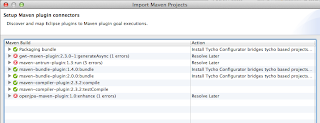
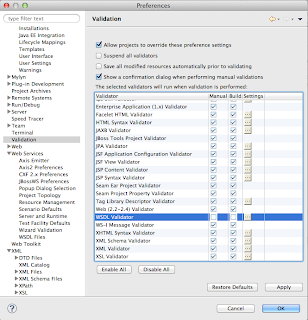
and opted to 'resolve later' and was able to continue. After it created my projects I ended up with errors in some projects. To fix them I needed to stop validation on dtd and wdsl going into the preferences
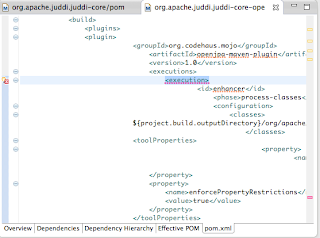
Also in some pom I got lifecycle errors which when hovering over the '' I could set to exclude in eclipse.
3. Now on your file system; go into the juddi-console directory and run
mvn clean install
this will generate some gwt interfaces
when this finishes you may have to Maven > Update project... for the
uddi-portlets project. Make sure the project now looks like
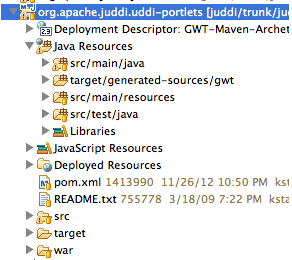
Note the inclusion of target/generated-sources/gwt.
4. Now start tomcat in juddi-tomcat/target/tomcat/apache-tomcat-6.0.26/bin

5. Now you can launch GWT from eclipse
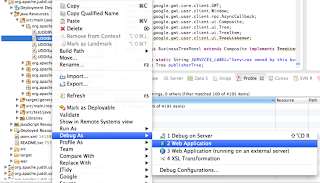
In the Google Development window select to attach to the UDDIBrowser using Chrome.
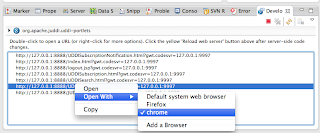
and log in using root/root and see the UDDI Browser
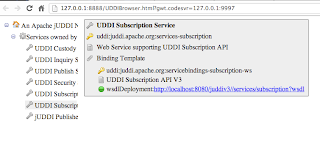
You can then set break points in both client side (the java code that ends up being javascript) and server side code. The server side code of the UDDIBrowser makes calls into the jUDDI back end (running on tomcat). You can start tomcat in debug and attach to the debug socket to step through that code as well.
Beside being able to debug the UDDIBrowser it is also the perfect development environment as changes to the code tend to be live immediately on saving the file (and hitting refresh in the browser).
Well, this ended up much longer then expected! I hope it helps you.
Good luck!
--Kurt
1. Start with a fresh eclipse Juno:
http://www.eclipse.org/downloads/packages/eclipse-ide-java-ee-developers/junosr1
2. Launch eclipse and go to the market place to install:
m2e:

subeclipse:

gwt:

but do not select tools for andriod:

JBoss tools:

Open the SVN Repository window and add the juddi repository


if you get the following error

then select the pure Java SVNKit

and continue to check out the trunk

When the checkout completes import all modules as projects using Check out as an existing maven projects


I got the following issues:

and opted to 'resolve later' and was able to continue. After it created my projects I ended up with errors in some projects. To fix them I needed to stop validation on dtd and wdsl going into the preferences

Also in some pom I got lifecycle errors which when hovering over the '

3. Now on your file system; go into the juddi-console directory and run
mvn clean install
this will generate some gwt interfaces
when this finishes you may have to Maven > Update project... for the
uddi-portlets project. Make sure the project now looks like

Note the inclusion of target/generated-sources/gwt.
4. Now start tomcat in juddi-tomcat/target/tomcat/apache-tomcat-6.0.26/bin

5. Now you can launch GWT from eclipse

In the Google Development window select to attach to the UDDIBrowser using Chrome.

and log in using root/root and see the UDDI Browser

You can then set break points in both client side (the java code that ends up being javascript) and server side code. The server side code of the UDDIBrowser makes calls into the jUDDI back end (running on tomcat). You can start tomcat in debug and attach to the debug socket to step through that code as well.
Beside being able to debug the UDDIBrowser it is also the perfect development environment as changes to the code tend to be live immediately on saving the file (and hitting refresh in the browser).
Well, this ended up much longer then expected! I hope it helps you.
Good luck!
--Kurt
Monday, February 27, 2012
First time running he JAXR TCK with a UDDI v3 Registry
I just ran the JAXR TCK tests using Scout-1.2.5 and a jUDDI-3.1.3 instance as the Registry backend. I was pleasantly surprised:
Test results: passed: 1,340; failed: 32
32 fails.. Almost there! Back to bug fix mode.
-----------------------
Update:
It looks like I found one real bug in scout (SCOUT-129) and one issue to with being backwards compatible with UDDI v2 default settings (SCOUT-127). A full run of all the JAXR tests results now in:
Test results: passed: 1,372
no fails, Hurray :)!
Going to prepare Scout-1.2.6.
Test results: passed: 1,340; failed: 32
32 fails.. Almost there! Back to bug fix mode.
-----------------------
Update:
It looks like I found one real bug in scout (SCOUT-129) and one issue to with being backwards compatible with UDDI v2 default settings (SCOUT-127). A full run of all the JAXR tests results now in:
Test results: passed: 1,372
no fails, Hurray :)!
Going to prepare Scout-1.2.6.
Tuesday, February 21, 2012
Using JAXR on JBoss 7.1.1
Introduction
One of the Technologies specified in the JEE6 Specification is the Java API for XML Registries (JSR 93). Apache Scout is the implementation of this specification. This specification is a client side library to interact with an XML Registry. Examples of XML Registries are UDDI and ebXML. To make a long story short, every Application Server needs to ship with a JAXR implementation, and this is what I have been helping out on.
JBoss JAXR module
On and off over the last few months I have been working on a JAXR module for JBoss-AS-7.1. The requirement for it was such that it needed to pass the JEE6 TCK, and that it should be able to interact with both UDDI v2 and v3 registries. Previous version of JBoss-AS have always shipped with a jUDDI v2 registry but, for the time being, it was decided to ship the client libraries only this time, which is the only JEE6 required component anyway. In other words, you need to have a running instance of jUDDI for the JAXR module to connect to.
How to use it?
Your deployment will only need to depend on the JAXR API, if you are using maven add the following to the dependencies section in your pom:
What if I don't want to use the default JAXR module configuration?
The default JAXR configuration lives in the standalone/configuration/standalone.xml:
JAXR specifies the following properties:
 Figure 1. The JAXR properties as specified in the JAXR specification.
and by default the following properties are set:
Additionally, when using the Scout implementation is used, the following properties are set by default
To use JAXR in the default configuration, simply use a standalone/configuration/standalone.xml with the following jaxr section:
This means that by default Scout connects to the UDDI registry using the UDDI v2 API specification, using the SaajTransport class. It is this configuration that was used for TCK compatibility testing as the JAXR specification has not been updated since the UDDI v3 specification was published.
What if I want to connect to a UDDI v3 Registry?
The Apache Scout implementation supports connecting to a UDDI v3 registry. For this it uses the jUDDI-client library, and the JBoss JAXR module supports using the following configuration in the standalone/configuration/standalone.xml:
Override the properties set in the configuration
In the first code fragment of this blog post it was shown that you can set properties before using the connection, using jaxrFactory.setProperties(properties). This will add these properties, or override the defaults. This way you can override property setting programmatically.
This concludes this post on using JAXR on JBoss-AS7.1. If you would like to add an entry on how to use Scout on another Application Server, then by all means send it to us and we will add it!
Cheers,
--Kurt
One of the Technologies specified in the JEE6 Specification is the Java API for XML Registries (JSR 93). Apache Scout is the implementation of this specification. This specification is a client side library to interact with an XML Registry. Examples of XML Registries are UDDI and ebXML. To make a long story short, every Application Server needs to ship with a JAXR implementation, and this is what I have been helping out on.
JBoss JAXR module
On and off over the last few months I have been working on a JAXR module for JBoss-AS-7.1. The requirement for it was such that it needed to pass the JEE6 TCK, and that it should be able to interact with both UDDI v2 and v3 registries. Previous version of JBoss-AS have always shipped with a jUDDI v2 registry but, for the time being, it was decided to ship the client libraries only this time, which is the only JEE6 required component anyway. In other words, you need to have a running instance of jUDDI for the JAXR module to connect to.
How to use it?
Your deployment will only need to depend on the JAXR API, if you are using maven add the following to the dependencies section in your pom:
Now you can get a handle to the JAXR ConnectionFactory simply by looking it up in JNDIjavax.xml jaxr-api 1.0_04 provided
InitialContext context = new InitialContext();
ConnectionFactory jaxrFactory = (ConnectionFactory) context.lookup("java:jboss/jaxr/ConnectionFactory");

Properties properties = new Properties();
...
//set some JAXR properties
...
jaxrFactory.setProperties(properties);

connection = jaxrFactory.createConnection();

//now you can set the credentials on this connection.
PasswordAuthentication passwdAuth = new PasswordAuthentication(userid, passwd.toCharArray());
Set creds = new HashSet();
creds.add(passwdAuth);
connection.setCredentials(creds);
at this point you should be able to execute any JAXR registry command. Make sure to add your own exception handling.What if I don't want to use the default JAXR module configuration?
The default JAXR configuration lives in the standalone/configuration/standalone.xml:
| connection-factory attribute | default value | description | required |
|---|---|---|---|
| jndi-name | - | Name used to bind into JNDI | Y |
| class | org.apache.ws.scout. registry.ConnectionFactoryImpl | Class name of the JAXR implementation the JAXR module will instantiate | N |
| property attribute | default value | description | required |
| name | - | Name of the JAXR property | Y |
| value | - | Value of the JAXR property | Y |
JAXR specifies the following properties:

and by default the following properties are set:
| JAXR property name | default value |
|---|---|
| javax.xml.registry.queryManagerURL | http://localhost:8080/juddi/inquiry |
| javax.xml.registry.lifeCycleManagerURL | http://localhost:8080/juddi/publish |
Additionally, when using the Scout implementation is used, the following properties are set by default
| Scout property name | default value |
|---|---|
| scout.proxy.uddiVersion | 2.0 |
| scout.proxy.uddiNamespace | urn:uddi-org:api_v2 |
| scout.proxy.transportClass | org.apache.ws.scout.transport.SaajTransport |
To use JAXR in the default configuration, simply use a standalone/configuration/standalone.xml with the following jaxr section:
This means that by default Scout connects to the UDDI registry using the UDDI v2 API specification, using the SaajTransport class. It is this configuration that was used for TCK compatibility testing as the JAXR specification has not been updated since the UDDI v3 specification was published.
What if I want to connect to a UDDI v3 Registry?
The Apache Scout implementation supports connecting to a UDDI v3 registry. For this it uses the jUDDI-client library, and the JBoss JAXR module supports using the following configuration in the standalone/configuration/standalone.xml:
Override the properties set in the configuration
In the first code fragment of this blog post it was shown that you can set properties before using the connection, using jaxrFactory.setProperties(properties). This will add these properties, or override the defaults. This way you can override property setting programmatically.
This concludes this post on using JAXR on JBoss-AS7.1. If you would like to add an entry on how to use Scout on another Application Server, then by all means send it to us and we will add it!
Cheers,
--Kurt
Friday, February 17, 2012
Release announcement jUDDI-3.1.3 and Scout-1.2.5
The jUDDI team is proud to announce the release of jUDDI-3.1.3 and Scout-1.2.5. Besides bug fixes, the latest release of jUDDI has seen development on the jUDDI client to make it easier to interact with the UDDI Registries. Besides using the client code to access our own Apache jUDDI Registry it has been tested to work with for example Systinet's and SAP's Registries. We added some interesting features to the client such as a clientside cache and the registration of WSDL and BPEL processes according to respectively technote Using WSDL in a UDDI Registry, Version 2.0.2 and Using BPEL4WS in a UDDI registry. More details on how to use this will follow.
On the JAXR front we made sure Scout-1.2.5 passes all tests in the JEE6 TCK. The tests were run using a jUDDI v2 registry, but we plan to make sure they also work using the latest jUDDI v3 registry.
The releases can be downloaded at:
http://juddi.apache.org/scout/releases.html and
http://juddi.apache.org/releases.html
Cheers!
--Kurt
On the JAXR front we made sure Scout-1.2.5 passes all tests in the JEE6 TCK. The tests were run using a jUDDI v2 registry, but we plan to make sure they also work using the latest jUDDI v3 registry.
The releases can be downloaded at:
http://juddi.apache.org/scout/releases.html and
http://juddi.apache.org/releases.html
Cheers!
--Kurt
Subscribe to:
Posts (Atom)